First of all, MySQL community server is needed for Zabbix Server. For the MySQL installation, you will need to user which have sudo privilege or root user (root user is recommended).
MySQL community version 8 was used. In order to download, below command was used
wget https://dev.mysql.com/get/mysql80-community-release-el7-2.noarch.rpmIn order to install,
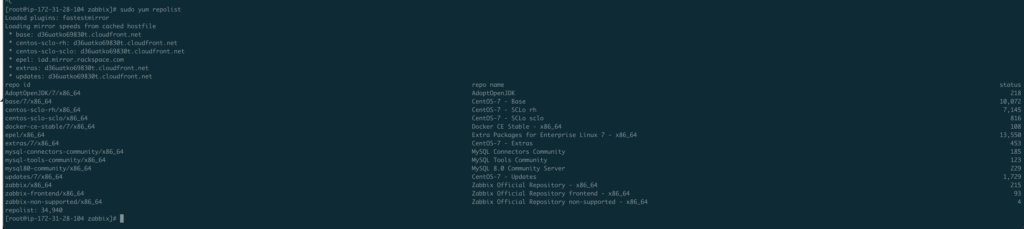
sudo wget https://dev.mysql.com/get/mysql80-community-release-el7-2.noarch.rpmsudo rpm -ivh mysql80-community-release-el7–2.noarch.rpmsudo yum repolistIf you see below output when you use above script, your MySQL installation is correct
In order to start mysql service;
sudo systemctl start mysqldTo check the status of the service
sudo systemctl status mysqldMySQL security configuration is done with below script
sudo mysql_secure_installationThis command will want from us the root password. In order to access temporary root password;
sudo grep 'temporary password' /var/log/mysqld.logA temporary password is generated for root@localhost: xxxxxxxxx
In order to create user for Zabbix and altering for access domains, connect to mysql from console
# mysql -uroot -p
xxxxxxxxx
mysql> create database zabbix character set utf8 collate utf8_bin;
mysql> create user zabbix@localhost identified by 'Zabbix321!';
mysql> grant all privileges on zabbix.* to zabbix@localhost;
mysql> create user zabbix@localhost identified with mysql_native_password by 'Zabbix321!';
mysql> create user zabbix@'%' identified by 'Zabbix321!';
mysql> grant all privileges on zabbix.* to zabbix@'%';
mysql> create user zabbix@'%' identified with mysql_native_password by 'Zabbix321!';
mysql> quit;
When the temp root pass is used for first entry, temp pass will be changed.
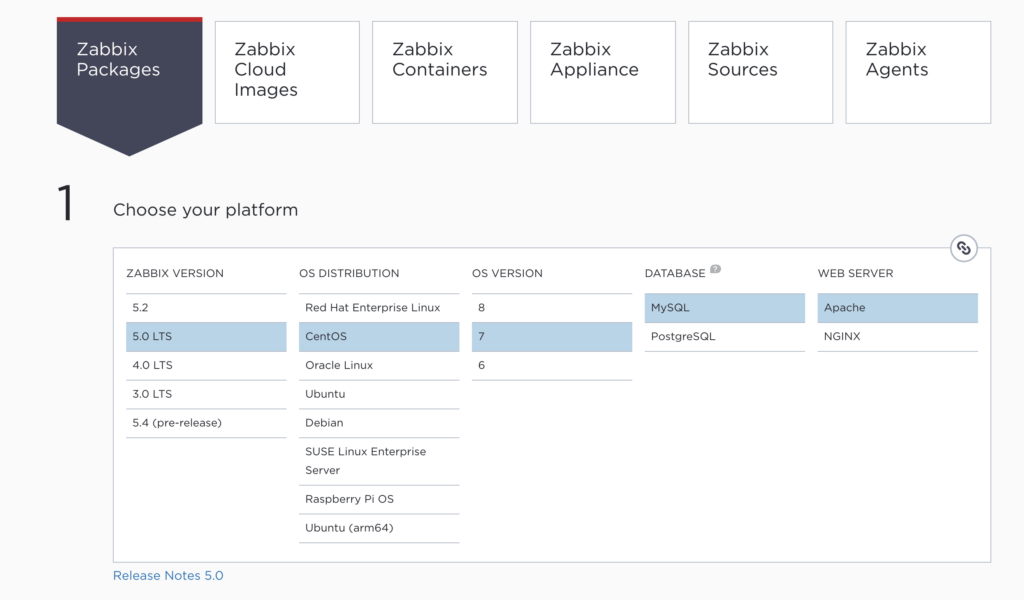
Official installation directives were followed for the Zabbix. (https://www.zabbix.com/download)
a. Install Zabbix repository
# rpm -Uvh https://repo.zabbix.com/zabbix/5.0/rhel/7/x86_64/zabbix-release-5.0-1.el7.noarch.rpm
# yum clean all
b. Install Zabbix server and agent
# yum install zabbix-server-mysql zabbix-agentc. Install Zabbix frontend
Enable Red Hat Software Collections
# yum install centos-release-sclEdit file /etc/yum.repos.d/zabbix.repo and enable zabbix-frontend repository.
[zabbix-frontend]
...
enabled=1
...
Install Zabbix frontend packages.
# yum install zabbix-web-mysql-scl zabbix-apache-conf-scld. Create initial database
Make sure you have database server up and running.
On Zabbix server host import initial schema and data. You will be prompted to enter your newly created password.
# zcat /usr/share/doc/zabbix-server-mysql*/create.sql.gz | mysql -uzabbix -pZabbix321!e. Configure the database for Zabbix server
Edit file /etc/zabbix/zabbix_server.conf
DBPassword=Zabbix321!f. Configure PHP for Zabbix frontend
Edit file /etc/opt/rh/rh-php72/php-fpm.d/zabbix.conf, uncomment and set the right timezone for you.
From
; php_value[date.timezone] = Europe/Rigato
php_value[date.timezone] = Europe/Rigag. Start Zabbix server and agent processes
Start Zabbix server and agent processes and make it start at system boot.
# systemctl restart zabbix-server zabbix-agent httpd rh-php72-php-fpm
# systemctl enable zabbix-server zabbix-agent httpd rh-php72-php-fpm
h. Configure Zabbix frontend
Before the configuring frontend, you should disable SELinux for running Zabbix Server service. On Centos 7, below command does not require the server reboot
echo 0 > /sys/fs/selinux/enforceConnect to your newly installed Zabbix frontend: http://server_ip_or_name/zabbix